So this weeks installment of my insane quest to make my backyard green while maintaining my sanity in the process is/was raised gardens.
We had a raised bed:
This sucker was 4 X 4 and 3 feet deep. since we were so completely clueless at the time (3 years ago) we went along with the recommendations of a local nursery. Yeah, how to buy 1 1/2 cubic yards of dirt and give them our money. I was a tool. :( But no more!!
After going to the same nursery to check out their latest stuff (this was sometime in october), I had noticed that their test raised beds were only 6" high. WTF?? So I grab the nearest sales person by the throat, pin then down on the ground and forced him to divulge all his raised gardening secrets. Well, not really, but it sounded exciting, right? I asked him politely, WTF???? He was mystified as to why anyone at his nursery would give us such colossally wrong info. Fine, just spit it out.
All I needed was 6" of something to corral the dirt and dirt. Well, hell, we had plenty of dirt. 1 1/2 cubic freaking yards!
So our back fence was in a advanced state of decay and between our fence and the neighbors chain-link grew several now dead trash trees (china berry and hack berry) So with crowbar and hammer in hand I went to town.

for the moment I just ripped down what I needed.

cut them to 4 foot lengths

and set to work getting them read for the raised bed.

The little U brackets will act as guilds for the rebar. However, dumb me forgot to take a pick of the L brackets for the corners. (I'll include a follow up post with a photo)
I began laying out my raised bed
You can see a little bit of the L bracket in this photo.
I then began connecting the pieces.

Yes, I know the photo looks upside down, that's because it is. I took it that way, okay? get off my back.
Here is the rebar (the most expensive part of this crazy thing)

These are 2 feet x 1/4" rebar. Each costs 1.25 a piece. Since this time I have improved my cutting torch skills, I will next time get a longer piece (save booku money) and cut it myself.

I drove the rebar down till the top edge was even with the top edge of the wood. Thus placing the rebar 1 foot 6 inches in the ground. It's not going anywhere.
Here is the completed layout.
Note the garden ghost.
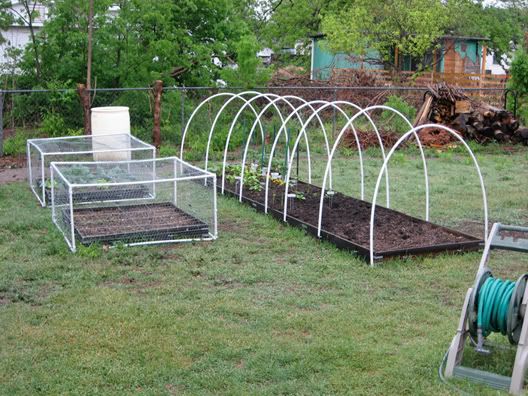
Here's what it looks like today:

I constructed the PVC/chicken wire enclosures to keep out the &%@*!! squirrels. The hoops on the long bed will support 60% cloth to cut down on the intense summer sun.
So there it is, our garden. We are currently growing: Kale, lettuce, peppers, turnips, beets, onions, garlic, potatoes, tomatoes, cucumber and squash.
This doesn't include our herbs, fruit trees and berry bushes. That's for another time
Remember: Green is Good!
Cheers!


No comments:
Post a Comment